It’s taken me a little time to get my Ubiquity UniFi G3 cameras to work in my Fibaro HC2, gathering information from all over the internet so here is my step by step guide.
First things first; there is no way you can currently add Unifi G3 cameras in to Fibaro HC2 directly, you have to have a UniFi NVR.
I’m currently running at the current levels:
Fibaro HC2 – 4.140
Unifi NVR – 3.8.0
UVC G3 Dome – 3.8.3
UVC G3 – 3.8.3
As I mentioned, the G3 cameras on the latest firmware do not support snapshot.jpg directly, which are required for Fibaro HC2. They do provide a RTSP Service but this is not supported in HC2, hence the need for the NVR.
What you are after is a string that looks something like this:
http:// <IP_of_NVR>:7080/api/2.0/snapshot/camera/<Camera_UID>?force=true&apiKey=<API_Key>
So as you can see, you need the Camera UID and the API key, but where do these come from?
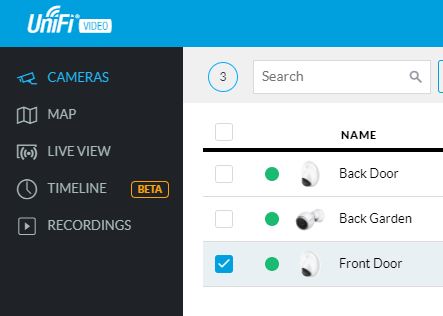
Camera UID:
On the NVR, go to Cameras and select the camera you want the UID for
In the detail panel enable the RTSP service (this does not need to be enable, it’s just to get the UID). Copy out the UID, dropping the _0 as shown
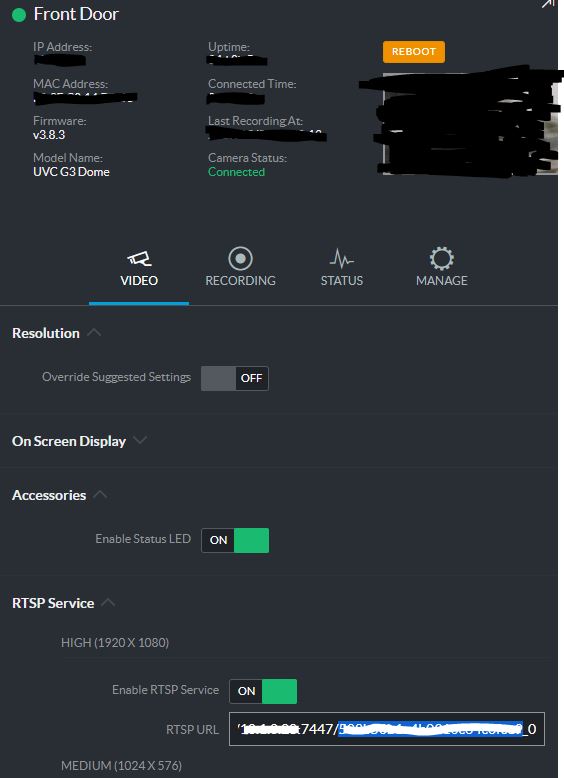
Turn off the RTSP Service, no need to save.
API Key:
On the NVR, Select users and create a user for use with Fibaro, I’ve given this user just Viewing access:
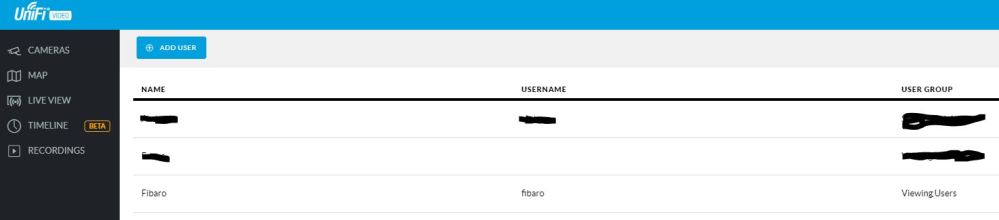
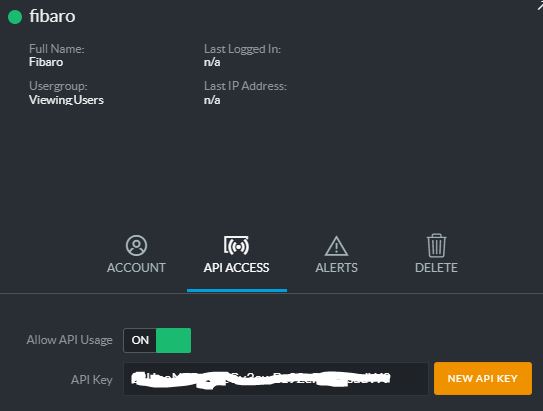
Select the user just created, in my case Fibaro and in the detail panel copy the API Key
Putting the full string together in a browser should now display the snapshot image. For Fibaro HC2 we need to break it up slightly:
IP Address = <IP_of_NVR>:7080
JPG Path = api/2.0/snapshot/camera/<Camera_UID>?force=true&apiKey=<API_Key>
MJPG Path = api/2.0/snapshot/camera/<Camera_UID>?force=true&apiKey=<API_Key>
(yes, both paths are the same)
You should end up with something like this:
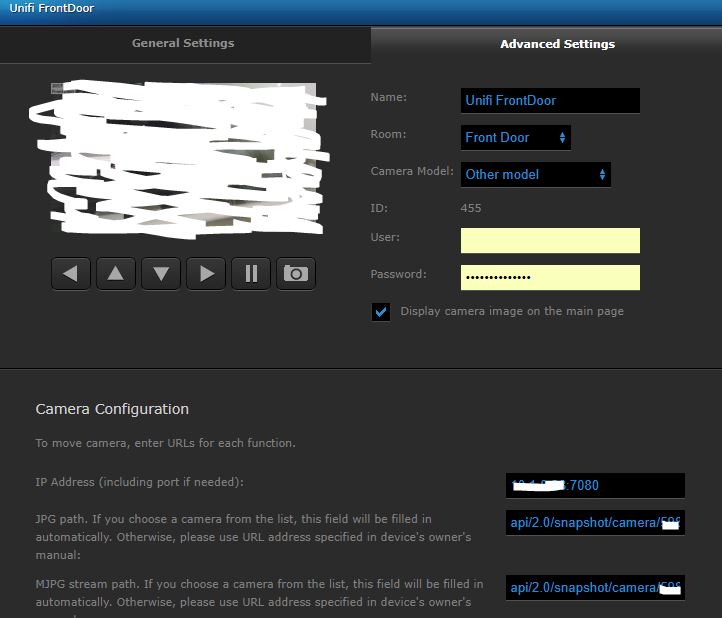
There is no need to enter the username or password of the fibaro user.
For some reason this process is only currently working for the G3 Domes I have, not the non Dome G3. I’ll work on this and update later. I may have just miss typed the string.
UPDATE – 03/01/2018:
This update tells you how to add a UniFi camera to Fibaro HC2 directly, you will still need the NRV to get the camera UID however.
When I first setup my one of my UniFi Dome G3 cameras I tuned off the microphone, there is a warning but I did it anyway. The reason for the warning is once it turned off it can’t simply be turned back on. You have to reset to factory settings. I had to do this to one of the cameras I’d added to my HC2 via my NVR with the method above. The odd thing was that after it’s reset and adding it back to the NVR I was no longer able to get it working with the HC2. Why, I still don’t’ know but it forced me to look at other methods. The following seems to work.
This time you will need the IP of the camera and Camera UID collected as above. You’ll also need to enable Anonymous Snapshots directly on the camera. To do this connect directly to the camera via a browser on its IP and switch it on and save the changes:
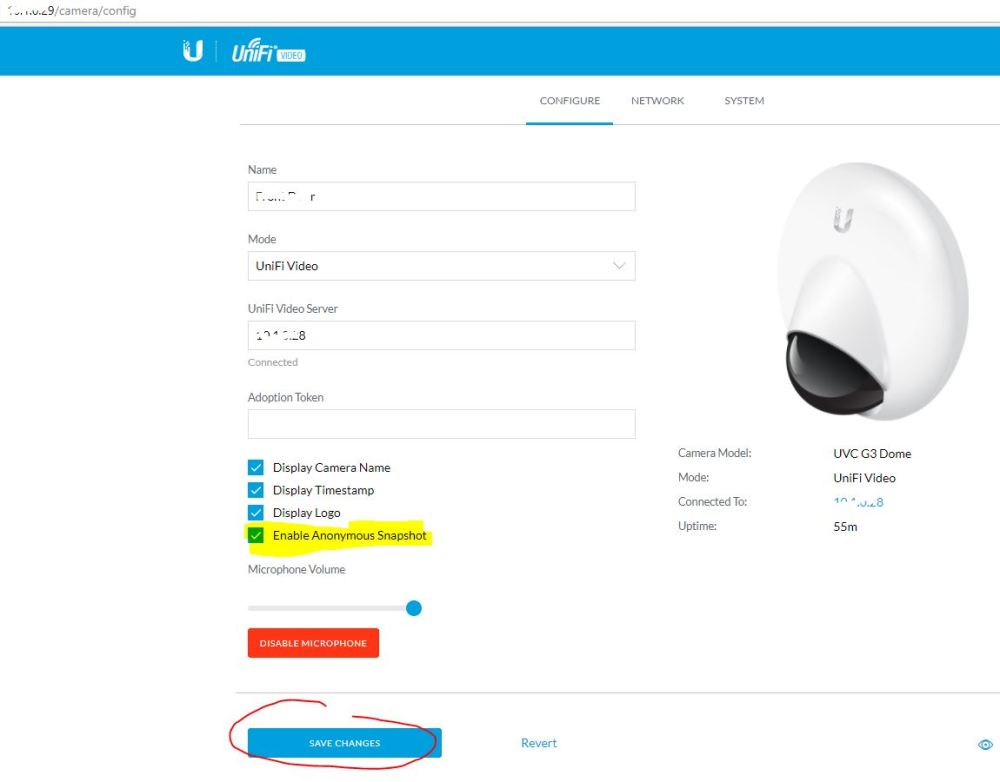
Now on the Fibaro HC2 setup the camera as shown with the following settings:
User = “local camera user ID”
Password = “local camera password”
IP = “IP of camera”
JPG Path = “/snap.jpeg?cb=<Camera UID>”
MJPG Stream = “/snap.jpeg?cb=<Camera UID>”

This method works for both types of G3 cameras.

MJPG Stream = “/snap.jpeg?cb=” what is it CameraD ?
LikeLike
Hi there, the only way I’ve been able to get the cameras UID is from the NVR, (detailed near the top of the post), so you’ll have to have a NVR in my experience.
LikeLike